
(Note: You are reading the progress from a project that began in August of 2014. This information was originally dated from May and June of 2015.)
Fuel Line & Pump, Engine/Transmission Install, Brakes
For all the drama around here when I set out to get something done on this old Ford, I know I could talk to one of these cable/satellite stations and get my own reality TV show! For starters, two days ago I was prepping to remove the Y block from the engine run stand so that I could put it on free standing legs, mount the flywheel, clutch, bell housing, and transmission with every intention of dropping the works in on Saturday (uh - is that tomorrow?). When I get to pokin' around I look things over and see a shiny thin line at the front of the valley pan where it meets the block...

"Is that just silicone?" I say to myself. It was so thin I had to get a screwdriver to touch it and see what it was made of. "Good Night!" I said as I smeared the oil off the tip of the flat blade screwdriver. "That valley pan is leaking!" You may recall during the initial run all things were good, just something small at the oil pump that needed one bolt tightened. I even checked all the way around after that episode... nothing. Until the other day! So... long story short I removed the intake and parts, removed the valley pan, cleaned all surfaces and REMOUNTED the sucker. If it leaks now I am going to take a CAULKING GUN to it after it is in the car. As a side bar, I did notice that the very front corner was a tick higher than the rest of the pan so it was NOT perfectly flat when installed originally.

Ok, so on to bigger and better things. I looked over in the corner of the shop and my eyes met the hard fuel line from kingdom come - yep, it was time to take a look at this thing and get on it. After all, I paid MORE FOR SHIPPING than the line cost itself lol. That sucker is HUGE. I jacked up the driver's side and took a look-see. "You have got to be kiddin' me," I said right out loud (by myself no less, just me and the tools, parts, and God). Seems the factory put the fuel line between the body and the frame in the rear of the car so there ain't no way I'm ever going to get it on in one piece unless I RAISE THE BODY OFF THE FRAME. So much for a front end R&R! This is getting ridiculous. After a few helpful fellas on the internet chimed in to confirm, I said "I give" and it will have to be "snipped". I guess now I am going to install an electric pump just because I can and maybe I just like the greater opportunity for another ISSUE!

Alright, so no big deal, let's keep going. "What else?" I say to myself... "There is plenty to do here." And so there is, I have brake lines waiting to be installed, new wheel cylinders, got to get the 3 speed on the tree all cleaned up and connected. (By the way when I shot the firewall the other day I also primed and painted the steering column! She looks real good.) I sauntered over to the engine I had finally got all buttoned up and off the run stand. It was sitting on its free standing frame unassumingly by the workbench just minding it's own business waiting for its tail end. I cleaned up a very good flywheel that had already been turned, installed a new pilot bearing, torqued the flywheel to specs, and the looked for the clutch and pressure plate... "Uh, where is the clutch and pressure plate?"
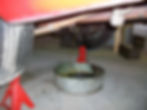
I looked around for a LOOOOONG time. "Jessup, how do you lose something that large? I mean the small spring clip for the clutch fork, I get it... but a clutch disc and the pressure plate? Really?" Still can't find them. I don't what I did with the box or the parts. I do have the throw out bearing. With the move going on and all the packing, slinging, tossing, kicking, beating, and what have you I have no idea where it got off to. Ridiculous. So now where are we... oh yeh - at a stand still on the engine and transmission. I could have sworn that the old 292 just sat there and winked at me when I wasn't watching! At least I manufactured a decent clip for the clutch fork... just a couple snips and turns with an old coat hanger and there you go - that's good for 15 more horses right? Well, whatever the case the Y block follies continue... However I did want to leave you with a photo of an invisible part I NEVER had but do need... It is the clutch equalizer bracket that bolts to the block at this location (I took two photos - one in darkness and one in the light, trying to get one of those ghost shots but it didn't work!)

I think I have located the "ghost of a part" from two different sources and it looks to be the booger. You can view the part photo over at y-blocksforever.com. Hopefully we will have that soon. Since I could not find that clutch disc and pressure plate I had to order a new set. They are on their way. It is a 10" version to match the flywheel... hopefully. Since the hard fuel line kicked my butt on installing it without any splices, I decided to kick its butt back and place an inline electric fuel pump on the frame rail. I am glad I decided to replace the fuel line - it was nasty inside and out and was very brittle in several places, but let's be honest - it is 60 years old! The old fuel line had to be cut in two different places to be removed, but all of the clips were in good shape. Also, I had the gas tank boiled out and coated several years and it is great shape. However, when I got to the fitting at the gas tank, it was a tight little booger. With little space afforded me, it even rounded off with a flare wrench. So, I broke out the set of Craftsman brand easy outs for NUTS (the drill easy outs NEVER work for me lol - I've got a load of stories on these pieces of junk).

Suffice to say, the idea is that you take one of these "doohickey's" and place it on your nut or fitting (that is right I used a plumbers pipe cutter to cut the line just at the fitting) and then use a wrench to turn the doohickey counter clockwise. It grabs the fitting and presto - you've got it out. Miracle of miracles - this tool lived up to its promise this instance.

I ended up cutting the new line (boy that was fun - hacking up a line that costs about $150 when the shipping was included) in two different places. One for the frame rail where the electric pump would be installed, and then one for going over the hump and between body right there above the rear axle housing. Tight I tell ya! The cuts I made on the NEW line were exactly in the same locations as the OLD line so I had point of references and I knew how the bends and curves went in and over the frame neatly. SAVE YOUR OLD LINE before you cut your new one! Also, remember that you will need to take out extra hard line to make room for your pump or even for your rubber hose at your splice.
I have owned this tool 15 years and have used it..... twice?

But let me tell you, it worked flawlessly. If you look at the fuel pump mount you can tell the mount uses two holes, top and bottom. The drill would go in straight on the bottom hole, no issues. But the for the top hole the rocker panel was in the way big time. Break out this little tool and away we go! After the holes were drilled I tapped each hole with 1/4" 20 tap so that I could bolt the fuel pump to the frame. By the way, I also used dielectric grease on the top bolt because it is holding the ground. The plan is to eventually wire this to a relay and then have a switch under the dash.


On to other things... One thing we were missing in the steering column change out when I bought the 56 version - the bracket that holds the column to the dash! So I dug out the old 55 column and disassembled the column. You can see from the photos that the assembly was pretty nasty. It is interesting to note that the 55 column has a two piece cup at the steering wheel mount.


I got the bracket removed with very little fanfare but as you can see the hole for the shift column is oblong. Something rubbed it out. I "think" it was the shift indicator for the Fordomatic? The part has been blasted and I did prime and topcoat a few pieces as well to end the day.

Next up - Brake Lines! I already have the front lines off, removed the side line when I took out the old fuel line, and have yet to remove the rear line on the axle housing. I do have all new lines to install though. Again, most of those lines that I removed are original to the car. Scarey.
Last night I did the same routine on all of the brake lines that I did on the fuel line earlier. Would you believe half of the hard lines were still original? I had replaced the brake hoses about 5 or 6 years ago and they are in great shape so I reused those. Most of the parts were all doing pretty good. I had used silicone brake fluid the last time I added a Master Cylinder and replaced all wheel cylinders, so this is a great time to "purge" out the old fluid and put in DOT 3 since I am going with a power brake setup. While I was on the rear axle replacing hard lines, I took the time to drain the fuel tank. The fuel had been in there about 3 or 4 years, and although I had added the ethanol treatment and Stabil, I decided to drain it all out.
Maybe this would be a good time to talk brakes on a 55/56 Ford. Most guys my age and younger have no idea how to "adjust" their brakes. They are so used to either calipers/pads and self-adjusting drum brakes that all of the other stuff here seems foreign. Most people that wrench on cars can "do a set of brakes" but there are some things peculiar to 55/56 Fords that I did take a few photos of...

Installing the new wheel cylinders is pretty straight forward, just make sure you know what side you are dealing with and all of that. I will say that up front that small mounting bolt behind the spindle upright is a PAIN to install if you have big fingers. That thing is right in the way.


The first thing some folks need to know is that the anchor pin shown above is an adjustment feature. If you noticed how the hardware looks when you reinstalled it, it is made in such a way as to slide up and down in the backing plate boss. The reason it has that oblong washer is so that it can slide. You will need a 15/16" wrench to loosen/tighten the nut behind it. Although the shop manual is not very clear the idea is that when installing new brakes you lower the pin as much as possible in its bore. I use a small amount of white lithium grease to help this out. Once you need to adjust your brakes later on and move the pin up you will be glad that it can slide. There is also an eccentric on the primary shoe. Speaking of the primary shoe, it ALWAYS goes towards the front of the vehicle.

The eccentric is turned by the head of the bolt ON THE BACK SIDE of the backing plate. If you spin it one time you can see where this would tighten the other side of the shoe as the brake linings wear. Of course you have your star adjuster at the bottom also. One thing I dislike... the bleed screws are 10 mm and not 3/8" on the last several wheel cylinders I have purchased. What gives? The threads for the mounting and for the brake line are all SAE??? any ideas?

One frustrating thing that happened. I got a new front and rear hardware kit for the car from Jackson's Old Time Auto Parts out in the Midwest. The kits came in two bags. I opened the one marked "FRONT" and proceeded to reinstall the shoes. You can tell from this photo below that I am glad I saved my parts. When I was fiddling with those spring hold downs that fly out all over the shop I was wondering why I could not get those boogers to lock down.

Well..... DUH! They were different sizes (after I started throwing things I decided to check my old parts.) On a whim I got out the other bag that was for the REAR. What do you know? They had the front/rear mixed up. I just sighed and kept on lol.

If you look at the photo above, you will see a good reason to save those rubber stoppers that come on your new wheel cylinders. While you are waiting to install other parts or to come back to your project you can pop them in the hole and keep junk out! Now comes the part a lot of you have been waiting for... "How in the Devil is he going to get that engine and transmission back into that car?" Welp, fighting the Devil just happens to be my area of expertise! Take note... and let the Y block follies resume: It was late one night, er... early in the morning about midnight to be exact when I wrapped up the other work and decided to get prepped to install the engine and transmission in the car together. We all know the drill - it tends to be the question that pops up frequently on the forums. "Do you pull the whole engine and transmission out together?" "How do you take it out with an automatic?" "Do I put them both back in at the same time?" Well, let's get rolling. The car has had an original Fordomatic ever since I can remember, and I have only ever pulled/installed a Y block in the car with an automatic. Since that original Fordo is CAST IRON and weighs about as much as the car, I have always split the two (engine and transmission). However on the umpteen parts cars I have fooled with I have always pulled the Y block out with the transmission and to be frank it has always been quite messy, a lot of bumping, groaning, metal grinding, etc to get them out. The angle has to be pretty steep. So what to do? Well at midnight "I ain't thinkin' about that." Let's just get this clutch installed. (remember I lost it ... had to order a set but it was only $100 shipped... "only") with the bellhousing and transmission all back together and we'll just throw it back onto the frame tomorrow. No trouble. Yeh right. Dufus me at midnight ... I was really not thinking straight. So with the nice Y block on the stand and all of my other parts painted up and what have you, I mounted up the clutch and pressure plate with my pilot tool. No problem. I had installed a new pilot bearing, had nice, clean bolts, and even got the torque wrench out to check my specs. We're good.


The fun ensues when I make the bonehead mistake of trying to install JUST THE BELLHOUSING first and then try to mate the transmission to the bellhousing and the clutch and the crank, etc. NO GO! A real Devil of a time I tell ya!

So after I wake up a little bit and tell myself, "You ain't turnin' in until you get this thing all together son," I snap my fingers and remind myself to mate the bellhousing to the transmission and THEN MATE THE BELLHOUSING TO THE BLOCK!
Literally 5 minutes later and the Devil was gone. Nice - turn out the lights and call it a day.


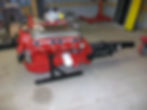
---------------------------- Next morning.... ---------------------------- First things first, WRAP THAT TRANSMISSION'S TAIL! I acquired some bubble wrap and went around the tail shaft a few times as you can see. I tell you - this idea saved my bacon and my firewall paint a few times during the install.

A couple of caveats...
1. I have not installed an engine and trans combo before
2. Sometimes a blind hog finds an ear of corn Now back to the blog. I contemplated going out and doing the tool loaner thing to get a leveler to attach to the engine hoist. Seeing as how the nearest auto parts is literally 20 miles away from me, "I don't think so!" We will get this done if we can get the right angle. Don't ask me how I did it, but the angle created by my attachment points on the block (front and rear) and the weight of the transmission were absolutely perfect. That, coupled with the fact that there was not front end sheet metal on the car made this doable. I am sure this would not work with front end sheet metal on the car... just not possible. Anyhow, after clearing all concrete of debris (you don't want your shop wheels stubbing over gravels or other tiny substances that will make your engine sway when you stop suddenly!) I got out the shop jack and placed it strategically so that I could make sure the tail shaft cleared the welded crossmember (see photos). The idea was to keep the attack angle the same until the tail shaft got to the jack and then go back and forth between jack and engine hoist so that the trans cleared and the engine mounts got lined up at the same time. For the record, I did wrap the threads of the engine mount studs with duct tape for a little protection.


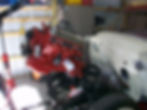


How I did this by myself I don't know... I guess it took 30 minutes from start to finish. Constant checks on the tight tolerances ARE a must. I had to get a bungee cord and wrap the exhaust pipe on the drivers side to the sheet metal so that it would be out of the way. I had to remove the levers on the transmission because they were about to hit the firewall tunnel, etc, etc. Yep, everything was tight. Sometimes it seemed that clearances were so tight when you were moving the whole works that you couldn't even swipe a credit card! It all went very well and here she is all fastened down...


For the record I got excited when I thought, "Man, I made it here and no dings on the firewall and not even a scratch!" Well I have to be honest to you fellas. I have no idea how when it happened but there is a small 1/16" inch of scratch on there. It is hard to see and I think the driver's side head makes it to where no one will ever see it so we are ok!